Showing posts with label Tutorials. Show all posts

Wednesday, January 12, 2011

Cardstock Medallion with scallop border Tutorial

 Hi Everyone!
I made a little video today of the card stock medallions I used for the "Dreaming of a White Christmas" card I made this December.  I have been receiving emails with questions on "How To Make" and questions on how I got the glitter to stick on the background.  So tomorrow, I am hoping to make the video tutorial on the glittered background paper.
Oh! I do have to mention one thing... I video taped this with my digital camera, so the quality is not the greatest, but I hope it helps!  :)


Tuesday, August 3, 2010

DYI: Paper Roses Tutorial

Start with three 6 petal flowers, I used the Cricut machine and the "Plantin Schoolbook" cartridge to cut out these flowers in 2 1/2".
First step is to cut out one petal from one of the flowers
.
Step two: Cut out two petals out of the second flower
.
Third step: Cut a slit on the remaining flower. From one side of a petal to the center of the flower.
Apply adhesive on the petal to the right of the cut line. be sure to spread it out over the entire flower petal as shown and lay one petal over the other.
Repeat this step for the flowers with five and four petals. Below is what you should have at this point.
With a tool such as a brush, piercing tool, pencil or any other round dimension, curl the petals of the flowers as shown below.

Curl one petal one way
And the other petal the opposite way.
Now that you have prepared all the flowers and petals, this is what you should have.
Now turn the flowers upside down and cut the bottom tips. This will allow the flower to sit flat on your projects and allow for center of flower fit better once you are assembling it.

Now you are ready to assemble. Place a small amount of adhesive on the inside of the flower and start stacking the flowers, from largest to smallest, adding adhesive time you add a flower.
If your flower ends up with a little bit of a tail, simply let it dry and prior to adding to your project snip the tail off and then add adhesive to place on your project.
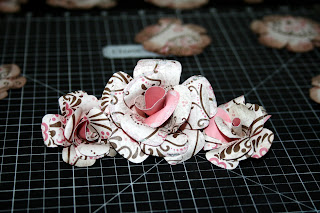
Once you are done assembling your paper flowers, this is the finished product.
Ces't Voila!
A beautiful paper rose... If you are brave enough and patient enough you simply must make a bed of roses. I'm in the middle of making 36 roses for a card swap.
I will share the finished product tomorrow.

Tip  Junkie handmade projects


Friday, July 30, 2010

Origami Boxes Tutorial

 
These little boxes are so easy to make and you can decorate them for any occasion by simply changing paper colors and embellishments.   Below is the tutorial on how to make these adorable little boxes, I will soon post the PDF. file for your convenience.
 
I started with a 12 x 12 paper and cut to 11 7/8" and 8 3/4"
 
With the 8 3/4" side across the top, place the left side of the cardstock on the 3" mark and score all the way down.  Flip cardstock over and score the other side at 3" too.  The middle section should be 2 7/8".

 
With the 11 7/8" across the top, from the left side measure to 1 1/2" and score all the way down, then measure to 4 1/2" and score all the way down.  Flip the cardstock and do the same to the other side.
 
With the 11 7/8" across the top, measure to 2 1/2" from the left of card-stock and cut vertically to the 3" horizontal scored line, do this for all four corners.
 
You will need to form a "T" with the cut line, so cut the horizontal scored line at the base of the 2 1/2" line.
 
Your paper should look like this after cutting.
 
Turn card-stock over and start folding up towards you on all the scored lines.  With permanent adhesive, adhere the center to create the box by over lapping the sections.
 
Bring in the sides of  the card-stock and adhere to form the lids of the box.
 
Ces't Voila!  You should have a 3" box ready for decorating.
 
Believe it or not, but I actually used these little boxes as gift wrap for baby shower presents.  
I put a baby outfit in each box!!!