Tuesday, August 10, 2010

Witch Hat Candy Holder Workshop

Join me for a Spooktacular workshop and make these super CUTE witch hats!!!
Friday, September 3rd 2010 at 6:30 PM
Don't worry if you can't make it to the workshop or if you live outside of San Diego,
Pre-purchase your kits for ONLY $15 and I will mail your kits directly to you!!!
($2.95 shipping fee)
Witch hat candy holders are 5" tall by 5" wide.
Included in your kit are:
Pre-Cut cardstock to make 20 hats
20 Pre-stamped "Happy Halloween" & Star images
2 spools of purple ribbon. (purple,orange,green)
Assembling Instructions
All you will need is scissors, adhesive and glue dots.
Pre- purchase your kits before Friday, August 27th 2010
 Paypal
email me at scrapbooking.ink at gmail.com
Kits will be shipped anywhere in the United States only.
SERIOUSLY!!!!  THESE ARE SOME CUTE CANDY HOLDERS.
closed as of 8/27/2010


Thursday, August 5, 2010

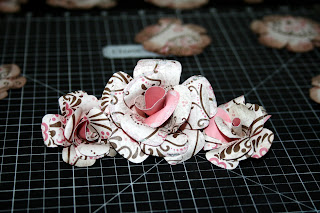
Paper Roses Flower Pot Cards


 Here are the roses that I have been working on for tonight's card swap at Bren's meeting. Originally, I was not planning to add any other colors to the card, however, my friend Gail emailed me and just happened to mention that this month, Bren has a color theme for the cards.  YIKES!!!! 


Ces't Voila!!
Here are my flower pots with Juniper (leaves), Tulip (band around the flower pot), thank goodness I distressed with Dessert Sand and the flower pot is actually Cocoa!!!!
Posted by Picasa

Pssst... Pssst....

Have you heard the news????

Starting September 1st 2010
You will be able to order my monthly workshop kits, here on my blog!!!!
More details to come....

Tuesday, August 3, 2010

DYI: Paper Roses Tutorial

Start with three 6 petal flowers, I used the Cricut machine and the "Plantin Schoolbook" cartridge to cut out these flowers in 2 1/2".
First step is to cut out one petal from one of the flowers
.
Step two: Cut out two petals out of the second flower
.
Third step: Cut a slit on the remaining flower. From one side of a petal to the center of the flower.
Apply adhesive on the petal to the right of the cut line. be sure to spread it out over the entire flower petal as shown and lay one petal over the other.
Repeat this step for the flowers with five and four petals. Below is what you should have at this point.
With a tool such as a brush, piercing tool, pencil or any other round dimension, curl the petals of the flowers as shown below.

Curl one petal one way
And the other petal the opposite way.
Now that you have prepared all the flowers and petals, this is what you should have.
Now turn the flowers upside down and cut the bottom tips. This will allow the flower to sit flat on your projects and allow for center of flower fit better once you are assembling it.

Now you are ready to assemble. Place a small amount of adhesive on the inside of the flower and start stacking the flowers, from largest to smallest, adding adhesive time you add a flower.
If your flower ends up with a little bit of a tail, simply let it dry and prior to adding to your project snip the tail off and then add adhesive to place on your project.
Once you are done assembling your paper flowers, this is the finished product.
Ces't Voila!
A beautiful paper rose... If you are brave enough and patient enough you simply must make a bed of roses. I'm in the middle of making 36 roses for a card swap.
I will share the finished product tomorrow.

Tip  Junkie handmade projects


Monday, August 2, 2010

What a difference a stamp makes!

 
130 invitations are ready to bring a little smile to a lot of people who will be invited to celebrate the beautiful Isabella Beckwith's 15th Birthday party at her "Quinceanera".

 
Her taste is simple and delicate.  During our initial meeting together we created a design for her invitation that reflected her style and combining the colors she selected for her party. 
The flowers are "Just Blooms" from Close to My Heart, colored by several showers of Tattered Angels, Glimmer Mist in "Tutti Frutti" and "Sunkissed Peach" colors.  Believe it or not, the center of the flower is a FLORAL ARRANGEMENT PEBBLE.  :)  Long gone are the days for traditional crafting.  
I love implementing non-traditional items to my designs.  
Typically I keep a sample of the invitations I create for clients.  In this case, I wanted to add a little more flair  to create more "Wow" factor.  The stamp is by CTMH named "Adoring Corners" .  I stamped with "Versa Mark" and used Gold Embossing Powder.  Click on the name of the product used to see more details and to order directly from my website. 
 
Ces't Voila!!! 

Posted by Picasa